Sunday, November 16, 2008

Organix I, II and III


Thought I'd follow up my last post with some more of my ceramic creations. The Organix series was an experiment for me in coil building. They are hand built of stoneware clay rolled into half-inch thick coils with the exterior suface showing them and the interior surface blended and worked to a smooth finish for strength. All pieces are salt-fired, drawing their glaze characteristics from the clay body itself. They stand approximately 32" tall and are completely hollow; no internal substructure for support.

This made them virtually impossible to successfully fire in the kiln for a number of reasons. Without internal structure, they stood a good chance of sagging or even collapsing during firing, when the temperatures would bring the clay up to nearly fluxing (turning liquid). The other problem was their height; in order to fit them into the kiln with other pieces, they had to be fired on the door sill. This put them in jeopardy when the firing was over and the door was slowly opened during the cooling phase. The introduction of colder air into the kiln could cause them to shatter due to the rapid temperature transitions. Any stress left in the clay body during the build would make them more vulnerable for failure.

As an attempt to mitigate some of the problems, I only used clay that had been carefully aged for 3-4 months. This ensured higher plasticity of the clay, and a more uniform moisture content in the body. I also built the pieces very slowly, allowing them to green-cure as they were being built. The pieces were worked on simultaneously for about a month, being added to in small stages. As the build progressed, they were tightly packed with newspaper that had been soaked with water and wrung out. This helped them cure more slowly, and left a pseudostructure of compressed paper inside of them for support.

One final decision was to do them as a continuous firing; no bisque first, then glaze. They would be brought up through the bisque, then on to the glaze firing in one shot. It was, to say the least, a bit of a nerve-wracking process! When the cool-down was complete, and the kiln door lowered, I have to say I was both proud and relieved. They had all survived the firing intact; the paper had flashed out when the kiln reached cone 10 (2381°F) and had left nothng but a small pile of ashes behind that was easily rinsed out of the pieces. The kiln gods had smiled, and I was in luck!

(click images for a closer view)

Organix I, II and III


Organix I, face view


Organix I, side view
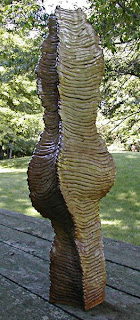

Organix II, face view


Organix II, side view


Organix III, face view


Organix III, rear view

Tuesday, November 11, 2008

Coiled, Salted and Fired


Decided maybe I should post a few pictures of some of my ceramic pieces. I don't have a kiln available to me these days, but if things every change so I have access again, I'd love to get back into it again. Shown here are pieces that are representative of my general style. I love hand building with coils, and I love the wonderfully rich and varied surfaces you get when you salt fire stoneware. It's always a surprise when you open the kiln door and peak in to see if the kiln gods have favored you!


The first piece is a coil built pitcher that I never got glaze fired. One of the snakes heads functions as a spout, and another's tail provides the handle.

Recoil - Front oblique - bisqued stoneware (not glazed)


Recoil - Side - bisqued stoneware (not glazed)


This piece is made from coils that have been flattened and formed into slabs.

Slab Pitcher - salt fired stoneware


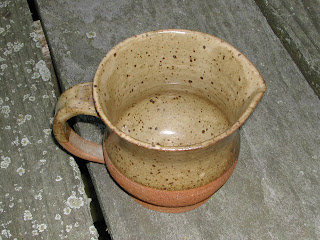
This is one of the few thrown pieces that I'm relatively happy with.

Small Thrown Pitcher - salt fired stoneware w/Druckman's speckle-tan glaze


Small Thrown Pitcher - salt fired stoneware w/Druckman's speckle-tan glaze


Next is a hand built study for what later became The Sirens. It came into being from a piece of clay that I had grabbed and worked in the dark while watching a filmstrip in ceramics class one day. I liked what I saw when I got it back into the light, so I developed The Sirens to carry that idea forward.

Study for The Sirens - green stoneware clay


Study for The Sirens - green stoneware clay


And lastly, The Sirens. This trio is hand built out of coils made from aged stoneware. The clay was aged in a 45# wedge for about 3-4 months to insure good plasticity. The tallest is approximately 14" tall.They were built on a shared base with all heads facing out and nested into each other at the rear, so that they would "reflect" each other somewhat when they were seperated. In order to get them to fire without cracking, the interiors were packed with dampened newspaper that ionized out when they were fired.

The Sirens - coil built salt fired stoneware


The Sirens - coil built salt fired stoneware

Tuesday, November 4, 2008

Dragon Harp


A couple of years ago, my wife decided to take up playing the celtic harp. After she had taken a good number of lessons and had tried out a few rental harps from her instructor, we decided it was time for her to have a harp of her own. A bit of research turned up someone who made harps to order at a reasonable price that lived near us. The only downside was that he really hated to sand and finish them! Still, no problem, because that's something I enjoy doing anyways. So, after picking out woods (Purpleheart and Ash) and waiting about 3 months, we finally got the call that the harp was done! Well, almost.

What we actually got was an assembled, but unsanded, unfinished and unstrung harp body. Now the fun began. I started sanding and rounding and bevelling surfaces and corners, and as the project progressed, I started thinking about it more. I decided that there was no reason that it should be just another "plain-jane" sort of harp when I had an opportunity to do something more with it!

I spent a while just looking at it and walking around it, and eventually an idea began to take shape. I began to see a dragon wrapping itself around the harp, a mythical and magical creature of the air! Some research found me examples that I was able to use for reference, and then the fun began! I spent the next month or so carving the form of the body into the bow and carefully working the finish into the wood. Then I gilded the wings, and set to work inlaying the semi-precious stones that the dragon guarded jealously!

Some successful bids on eBay brought me the faceted gem-grade spessarite garnets that were inset as her eyes, and an assortment of other stones; carnelian and andean opal, labradorite, amethyst, tiger-eye, malachite and others.

Finally came the job setting the tuning pegs and stringing it up! That took nearly a whole day by itself, but when it was done, she at last had her voice! It was deep, full and resonant, and has only improved over time as the soundboard and strings have settled into place.


(click images for closer view)


Right profile view


Dragon eye detail


Wing detail


Tail detail


Left profile view

all images ©2007 J. Nichols

Sunday, November 2, 2008

Autumn Colors


I had the opportunity today to get in a few photos of some of the beautiful trees near where I live. This year has offered some remarkable color, some of the best I've seen in a few years. Click for larger images & enjoy!


Maple leaves


Trees and fenceline


Japanese maple


Kwanzan cherry leaves


More maple leaves


Blueberry leaves


all images ©2008 J. Nichols