Sunday, November 16, 2008

Organix I, II and III


Thought I'd follow up my last post with some more of my ceramic creations. The Organix series was an experiment for me in coil building. They are hand built of stoneware clay rolled into half-inch thick coils with the exterior suface showing them and the interior surface blended and worked to a smooth finish for strength. All pieces are salt-fired, drawing their glaze characteristics from the clay body itself. They stand approximately 32" tall and are completely hollow; no internal substructure for support.

This made them virtually impossible to successfully fire in the kiln for a number of reasons. Without internal structure, they stood a good chance of sagging or even collapsing during firing, when the temperatures would bring the clay up to nearly fluxing (turning liquid). The other problem was their height; in order to fit them into the kiln with other pieces, they had to be fired on the door sill. This put them in jeopardy when the firing was over and the door was slowly opened during the cooling phase. The introduction of colder air into the kiln could cause them to shatter due to the rapid temperature transitions. Any stress left in the clay body during the build would make them more vulnerable for failure.

As an attempt to mitigate some of the problems, I only used clay that had been carefully aged for 3-4 months. This ensured higher plasticity of the clay, and a more uniform moisture content in the body. I also built the pieces very slowly, allowing them to green-cure as they were being built. The pieces were worked on simultaneously for about a month, being added to in small stages. As the build progressed, they were tightly packed with newspaper that had been soaked with water and wrung out. This helped them cure more slowly, and left a pseudostructure of compressed paper inside of them for support.

One final decision was to do them as a continuous firing; no bisque first, then glaze. They would be brought up through the bisque, then on to the glaze firing in one shot. It was, to say the least, a bit of a nerve-wracking process! When the cool-down was complete, and the kiln door lowered, I have to say I was both proud and relieved. They had all survived the firing intact; the paper had flashed out when the kiln reached cone 10 (2381°F) and had left nothng but a small pile of ashes behind that was easily rinsed out of the pieces. The kiln gods had smiled, and I was in luck!

(click images for a closer view)

Organix I, II and III


Organix I, face view


Organix I, side view
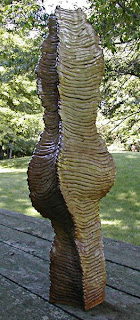

Organix II, face view


Organix II, side view


Organix III, face view


Organix III, rear view

Tuesday, November 11, 2008

Coiled, Salted and Fired


Decided maybe I should post a few pictures of some of my ceramic pieces. I don't have a kiln available to me these days, but if things every change so I have access again, I'd love to get back into it again. Shown here are pieces that are representative of my general style. I love hand building with coils, and I love the wonderfully rich and varied surfaces you get when you salt fire stoneware. It's always a surprise when you open the kiln door and peak in to see if the kiln gods have favored you!


The first piece is a coil built pitcher that I never got glaze fired. One of the snakes heads functions as a spout, and another's tail provides the handle.

Recoil - Front oblique - bisqued stoneware (not glazed)


Recoil - Side - bisqued stoneware (not glazed)


This piece is made from coils that have been flattened and formed into slabs.

Slab Pitcher - salt fired stoneware


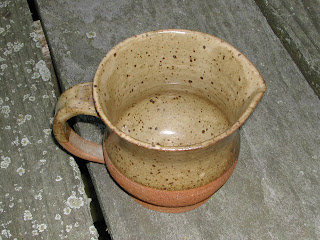
This is one of the few thrown pieces that I'm relatively happy with.

Small Thrown Pitcher - salt fired stoneware w/Druckman's speckle-tan glaze


Small Thrown Pitcher - salt fired stoneware w/Druckman's speckle-tan glaze


Next is a hand built study for what later became The Sirens. It came into being from a piece of clay that I had grabbed and worked in the dark while watching a filmstrip in ceramics class one day. I liked what I saw when I got it back into the light, so I developed The Sirens to carry that idea forward.

Study for The Sirens - green stoneware clay


Study for The Sirens - green stoneware clay


And lastly, The Sirens. This trio is hand built out of coils made from aged stoneware. The clay was aged in a 45# wedge for about 3-4 months to insure good plasticity. The tallest is approximately 14" tall.They were built on a shared base with all heads facing out and nested into each other at the rear, so that they would "reflect" each other somewhat when they were seperated. In order to get them to fire without cracking, the interiors were packed with dampened newspaper that ionized out when they were fired.

The Sirens - coil built salt fired stoneware


The Sirens - coil built salt fired stoneware

Tuesday, November 4, 2008

Dragon Harp


A couple of years ago, my wife decided to take up playing the celtic harp. After she had taken a good number of lessons and had tried out a few rental harps from her instructor, we decided it was time for her to have a harp of her own. A bit of research turned up someone who made harps to order at a reasonable price that lived near us. The only downside was that he really hated to sand and finish them! Still, no problem, because that's something I enjoy doing anyways. So, after picking out woods (Purpleheart and Ash) and waiting about 3 months, we finally got the call that the harp was done! Well, almost.

What we actually got was an assembled, but unsanded, unfinished and unstrung harp body. Now the fun began. I started sanding and rounding and bevelling surfaces and corners, and as the project progressed, I started thinking about it more. I decided that there was no reason that it should be just another "plain-jane" sort of harp when I had an opportunity to do something more with it!

I spent a while just looking at it and walking around it, and eventually an idea began to take shape. I began to see a dragon wrapping itself around the harp, a mythical and magical creature of the air! Some research found me examples that I was able to use for reference, and then the fun began! I spent the next month or so carving the form of the body into the bow and carefully working the finish into the wood. Then I gilded the wings, and set to work inlaying the semi-precious stones that the dragon guarded jealously!

Some successful bids on eBay brought me the faceted gem-grade spessarite garnets that were inset as her eyes, and an assortment of other stones; carnelian and andean opal, labradorite, amethyst, tiger-eye, malachite and others.

Finally came the job setting the tuning pegs and stringing it up! That took nearly a whole day by itself, but when it was done, she at last had her voice! It was deep, full and resonant, and has only improved over time as the soundboard and strings have settled into place.


(click images for closer view)


Right profile view


Dragon eye detail


Wing detail


Tail detail


Left profile view

all images ©2007 J. Nichols

Sunday, November 2, 2008

Autumn Colors


I had the opportunity today to get in a few photos of some of the beautiful trees near where I live. This year has offered some remarkable color, some of the best I've seen in a few years. Click for larger images & enjoy!


Maple leaves


Trees and fenceline


Japanese maple


Kwanzan cherry leaves


More maple leaves


Blueberry leaves


all images ©2008 J. Nichols

Sunday, October 26, 2008

Toxic images


Thought I'd share some new images of poisonous plants.
The first is a new digital manipulation, and the second is my first (crude) attempt at an HDR image. Let me know what you think!
(click images for a larger view)

Pokeberry ©2008 J. Nichols


Deadly Nightshade ©2008 J. Nichols


Monday, October 13, 2008

Autumn's Splendors


Got a chance today to head out with the camera and document a bit of the changing seasons. Always nice to see the colors change as the days grow shorter and the temperatures fall. Let me know what you think; C & C’s always welcome!


(Click for larger image.)


Pretty Poison ©2008 J. Nichols


Russian Sage ©2008 J. Nichols


Salvia ©2008 J. Nichols


Saturday, October 11, 2008

After the Frost


A new scanograph that I did today to celebrate the change of season. Let me know what you think!

Click for larger image.

After the Frost ©2008 J.Nichols

Friday, October 10, 2008

Sphere of Influence


Thought I’d post an image that I’d tweaked a bit in PS. The original image is a scanograph of a glass sphere that I made last year. I’ve never been able to successfully capture the color when I’ve tried to photograph it. This comes close to how it looks when lit from below. C & C’s welcome!

Click for larger image.

Sphere of influence ©2008 J. Nichols


Sunday, September 28, 2008

MyArtSpace Scholarships and Contest!


www.myartspace.com has created a scholarship program for students of artistic merit wishing to continue their education in an approved MFA, BFA or other higher level degree program (BA or BS in Art) for the arts. The scholarship is intended for students who exhibit exceptional artistic excellence. All mediums are accepted. Including, photography and video, both contemporary and traditional in nature. The scholarship arises from the commitment to supporting artists who are committed to their skill and development as an artist.

For two years myartspace has been a key figure in availing opportunity in the arts on the web and in global events. Myartspace is providing three scholarship prizes for undergraduate students and separately three scholarship prizes for graduate students. Creating an account on myartspace is free. Entering the scholarship competition is free.
The deadline for registration and online submission of work is November 21, 2008. You must upload your JPEGS/videos into a myartspace online gallery. Up to 20 images can be submitted for consideration. Scholarship winners will be announced on December 19, 2008.


First Prize:
$5000 for undergraduate student
$5000 for graduate student

Second Prize:
$2000 for undegraduate student
$2000 for graduate student

Third Prize:
$1000 for undergraduate student
$1000 for graduate student

For more information: www.myartspace.com/scholarships

www.myartspace.com has also launched a joint competition with the Bridge Art Fair. Finalists in the Art Basel Miami competition will display their art at the Bridge Art Fair art Art Basel in Miami this December. The Jury panel for the competition includes Elisabeth Sussman from the Whitney Museum, Janet Bishop from the San Francisco Museum of Modern Art (SFMOMA), JoAnne Northrup from the San Jose Museum of Art, and Michael Workman the founder of the Bridge Art Fair.

For more information visit-- www.myartspace.com/miamibasel/

Saturday, September 27, 2008

Something oldish, something newish

I’ve been at a bit of a creativity loss lately, so I’ve decided to revisit some earlier works and rework some of them a bit. Here are two of my "new" old pieces. C&C’s welcome!


Rattus 2.0 ©2008 JNichols


Violent Flower, Cropped ©2008 JNichols

Saturday, September 20, 2008

In a child's eyes


Click on this image for a close-up view.


In a child's eyes was one of my first scanographic assemblage pieces. I first arranged and scanned several groups of objects that I had collected over the years, then the scans were assembled into the finished piece. It is an attempt to evoke something of the innocense and curiosity of youth, represented by the strange things that we accumulate with magpie-like zeal.

Tuesday, September 16, 2008

The Kingdoms


These are the first two scanographic images from a series that I started last year. I intend to carry the concept forward with a series of related scans in each series, and also to add a third unifying series. I have been accumulating elements to use in this project for about a year now, and I hope to get started on the next images in the near future.
Comments are always welcome!


Kingdoms of Nature


Click on the images for a close-up view.


Kingdoms of Man


Saturday, September 13, 2008

Conophthoric tunnels


It’s been a while since I’ve done anything new, so I finally started a series of images based on scans of the beetle burrows in a white pine limb that I found. Don’t know where the series may go (or if it will go any further) from here, but here are some of the first of the new pieces. Questions, crits and comments are always welcome!


Click on the images for a close-up view.


Thursday, September 11, 2008

Who wooden like them?


Click on the images for a close-up view.


A few years ago we lost an old apple tree that I loved. I saved a few pieces of the wood were good enough to work with, with the intent on making something useful out of them as a way of memorializing the tree. After they were properly seasoned, I cut one of them to length and then carefully sawed three nested spatula blanks from it. I next carved each of the differently sized and shaped blanks into the finished spatulas using gouges and chisels. They were shaped so that they would all fit together nicely when done. The final finish was multiple coats of mineral oil that was vigorously rubbed in and allowed to stand on the surface until the wood was saturated. I used mineral oil because it's food-safe and it doesn't turn rancid like vegetable oils will.


From another piece of the same apple wood, I carved this set of cooking spoons, employing pretty much the same technique that I used for the spatulas.


This last spatula was carved from a piece of rock maple that I was given by a friend. The grain is highly figured, and quite beautiful in person! All of the utensils shown above are used pretty much daily, and have been in use for a number of years now. They have held up well, and their patina and character continue to grow.

Tuesday, September 9, 2008

From the Anvil's Edge


Click on the images for a close-up view.


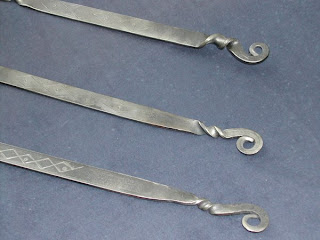
Here is an example of some of the forge work I've done. This is a fireplace set that I made a few years ago for my wife. They are a reproduction set based on 18th c. patterns, and consist of a flesh fork, spatula and a ladle. It took about a week to do all of the forge work and then they were coated with cooking oil and baked in a slow oven for a few hours to season them and prevent them from rusting.


This is a detail shot showing the tangs of the handles and the hand rivetting.


This is a detail shot showing the working of the eyes on the handles. You can also see some of the decoration on the handles if you look closely.